Draft it Help System
The complete Help system for Draft it is available on these pages.
How To
Activate Draft it V5
Modify Items
The Program Interface
Modifying Items
Modifying/Moving an Arc
Modifying/Moving a Door
Modifying/Moving a Window
Modifying/Moving an Opening
Modifying/Moving a Staircase
Modifying/Moving a Wall
Modifying/Moving a Roof
Modifying/Moving an Ellipse
Modifying/Moving a Line
Modifying/Moving a Polyline
Modifying/Moving a Polygon
Modifying/Moving Text
Modifying/Moving Dimensions
Modifying/Moving an Area Fill
Modifying/Moving Hatching
Modifying/Moving an Image
Modifying/Moving a Symbol
Modifying/Moving Multiple Entities
Modifying the Layer of an Item
Modifying the line Style of an Item
Modifying the Colour of an Item
Use Snaps And Input Options
Keyboard Snaps
The Origin Point
Snap
Direct Input
X Y Input
Polar Input
Distance Input
Scale Factor Input
Arrow Key Input
Force Angle
IntelliSnap
Wall Snap Points
Add Hyperlinks to Entities
Cancel a Command
Create a Symbol
Create a Template
Enter Calculations
Insert a Door
Insert a Window
Insert an Opening
Insert an Elevation
Repeat a Command
Select Items
The Basics
Use Shortcut Keys
Use The 15 Day Trial
Work with Layers/Colours/Styles
Work with Documents
The File Menu
The Ribbon
Tutorials
The Draft It Ribbon
Architectural Ribbon Page
System Toolbar
Building Group
Draw Ribbon Page
Roofs
View Group
Architectural Symbols Group
Sections Group
Roofs Command
Accessories
Doors
Elevation Hatch
Openings
Staircases
Walls
Wall Settings
Windows
Add Downpipe
Add Gutter
Angled Ridge Tile
Box Valley
Cement Gable Fillet
Dry Verge System
Edit Barge Boards And Gable Soffits
Edit Facias And Eaves Soffits
Horizontal Flashing
Mono Ridge Tile
Remove Roof Accessories
Semi Circular Ridge Tile
Stepped Flashing
Dormers
Create Roof
Edit Roof
Add Multi Pitch
Change Appearance
Change Eaves Height
Change Pitch
Change Thickness
Edit Overhang
Make Barn Hipped
Make Dutch Gable
Make Gable
Make Hipped
Legacy Roofs
Manual Edits
Extend Face By Polyline
Extend Face By Rectangle
Trim Face By Polyline
Trim Face By Rectangle
Remove Roof Modification
Roof Openings
Annotation Group
Modify Ribbon Page
Angular Dimension
Arrow
Attribute
Break Dimension Line
Chain Dimension
Datum Chain Dimension
Datum Dimension
Diameter Dimension
Double Arrow
Find And Replace
Linear Dimension
Multi Point Dimension
Radial Dimension
Radial Length Dimension
Set Datum
Table
Text
Draw Group
Constructions
Objects Group
Constructions
Angular Construction Line
Delete Constructions
Horizontal Construction Line
Incremental Offset
Perpendicular Line To Line
Perpendicular Line
Repeated Offset
Single Offset
Tangent To Arc
Tangent To Two Arc
Vertical Construction Line
Arc
Area Fill
Centreline
Circle
Control Point
Curve Fit
Ellipse
Filled Polyline
Hatch Pattern
Hatch
Insertion Point
Line
Multiline Styles
Multiline
Offset
Point
Polygon
Polyline
Rectangle
Rectangular Revision Cloud
Revision Cloud
Set Insertion Origin
Modify Group
Settings Ribbon Page
Blend
Break
Build Polyline
Build Symbol
Chamfer
Clear Selection
Copy
Copy To Other
Delete
Divide
Explode
Fillet
Hide Layers
Isolate Layers
Linear Array
Make Layer Current
Match Colour
Match Layer
Match Properties
Match Style
Mirror
Move
Polar Array
Quick Trim
Rectangular Array
Rotate
Scale
Select All
Select Colour
Select Hyperlink
Select Layer
Select Style
Selection Filter
Stretch
Tangent to 2 Arcs
Trim
Trim / Extend
Un-Hide Layers
Un-Isolate Layers
Drawing Settings Group
Views & Zoom Ribbon Page
Command Specific Ribbons
Minimise/Expand the Ribbon
Configure Textures
Copy Settings
Dimension Styles
Grid And Snaps
Layers
Multiline Styles
Page
Pens
Points
Units
Info Group
Show / Hide Group
3D Viewer
Area Fill
Command
Hatching
Layouts
Properties
Referenced Drawings
Reset Layout
Symbol Library
System Settings Group
The System Toolbar
Zoom Window
Zoom Full Page
Zoom Extents
Grid
Nearest Point
IntelliSnap
Angle Lock
Refresh
Help
About Draft it
Quick Access Toolbar
The Quick Access Toolbar
Customise Quick Access Toolbar
New
Open
Save
Print
Cut
Paste
Copy (Clip)
Undo
Redo
Command Window
Drawing Tabs
Layout Explorer
Properties Explorer
Referenced Drawings
Status Bar
Symbol Library Explorer
Architectural Tutorial
Tutorial Overview
Part 1 - Drawing Setup
Part 2 - The Ground Floor Plan
Tutorial No 1
Drawing the External Walls
Drawing the Internal Walls
Inserting Doors
Inserting Windows
Add the Staircase
Add the Furniture
Part 3 - Create the First Floor Plan
Copy the Ground Floor Details
Modify the Staircase Detail
Modify the First Floor Walls
Adding the First Floor Doors
Adding the First Floor Furnitire
Part 4 - Drawing Roofs
Part 5 - Creating the Elevation
Tutorial Overview
T1 - Part 1
T1 - Part 2
T1 - Part 3
T1 - Part 4
T1 - Part 5
T1 - Part 6
T1 - Part 7
T1 - Part 8
T1 - Part 9
T1 - Part 10
T1 - Part 11
Tutorial No 2
Tutorial Overview
T2 - Part 1
T2 - Part 2
T2 - Part 3
T2 - Part 4
T2 - Part 5
T2 - Part 6
T2 - Part 7
T2 - Part 8
T2 - Part 9
T2 - Part 10
T2 - Part 11
Tutorial No 3
Tutorial 3

Available in: FREE, Plus, PRO & Architectural
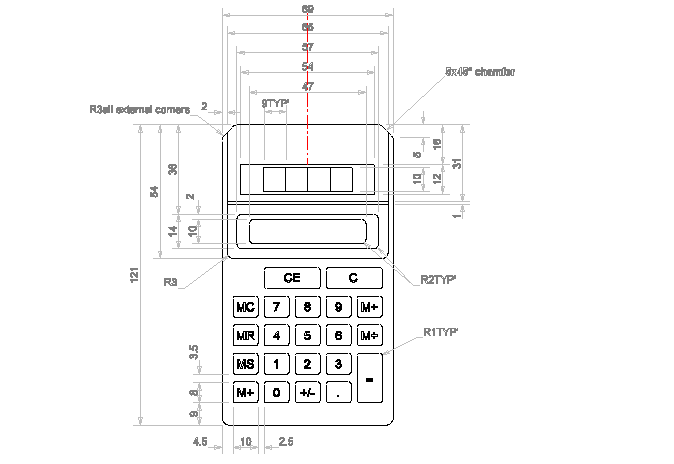
This third tutorial guides you through the construction of the following simple electronic calculator. The tutorial is broken down into small topics listed in the table of contents.
The method used to construct this drawing is designed to demonstrate a range of Draft it commands with minimal co-ordinate entry from the keyboard.

