Draft it Help System
The complete Help system for Draft it is available on these pages.
Available in: FREE, Plus, PRO & Architectural
Now we will use Entity Handles to Modify some of the lines. Make sure no command is selected, i.e. the prompt should read:
Select Command or Item(s) to Modify, Click & Drag for Multiple Selection
If the prompt does not say this hit the![]() key.
This should cancel any active command.
key.
This should cancel any active command.

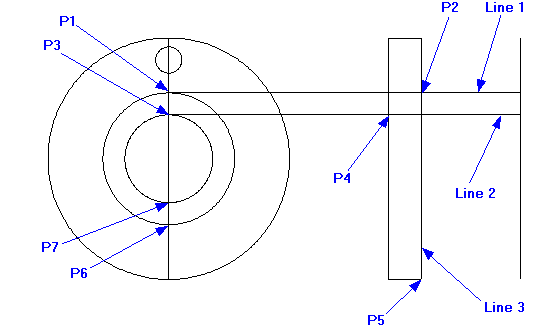
Select 'Line 1' line and its Entity Handles are displayed. Click on the left blue handle (P1) and drag it back to the 'Perpendicular' point at (P2) and click into place.
The line remains selected so now click on 'Line 2' and drag handle at P3 back to the 'Perpendicular' point at P4.
Now click on 'Line 3' and drag the bottom handle at P5 up to the 'End' point at P2.
Next select the Offset button
![]() , and click on line 1.
, and click on line 1.
Move the cursor (if you see a dynamic dimension hit
![]() to turn Snap on ) down and left to the 'Quad' point at P6 and click.
to turn Snap on ) down and left to the 'Quad' point at P6 and click.
Repeat the command and select 'Line 2' and click on the 'Quad' point at P7 as the offset point.

Use the Line command to add a line between P1 and P2 and cancel the line command.
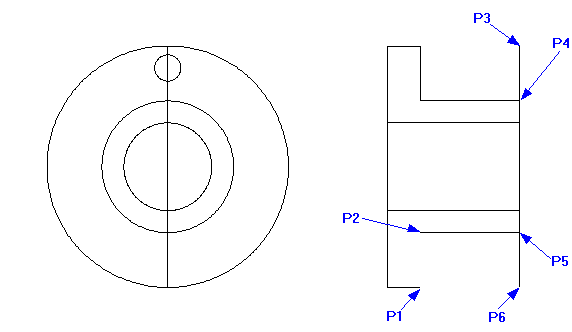
Now click on the rightmost vertical line. Use the Entity Handles to drag P3 down to P4 and then drag P6 up to P5.
