Draft it Help System
The complete Help system for Draft it is available on these pages.
Available in: FREE, Plus, Pro and Architectural
This command is not available until a selection set is present. i.e. you must pre-select the item(s) to array before selecting the array command.
Once you have selected the item(s) to array select the button
 and the Ribbon changes to display two additional options, 'No.',
'Rotate Copies' and 'Fit Copies' as follows.

'No.' refers to the number of copies required in the array. 'Rotate Copies' when switched OFF forces each copy of the selection set to maintain the original orientation. When switched ON each instance is rotated to maintain alignment to the circumference. See the examples below. We will look at the effect of the final option 'Fit Copies' later in the topic.
The prompt reads:
Give Centre Point of Array:
Now select the centre point of the array using any of the snaps and input options. This is the point by which the items in the array are rotated around.
The system toolbar changes to display the snaps and input options.
Similar to the following (depending upon the last use).

The prompt now reads:
Give Reference Point:
A dynamic line is drawn from the centre point to the cursor position, this dynamic line represents the start angle of the array. This therefore is where the array angle is measured from. Select the reference point using any of the snaps and input options.
If 'Rotate Copies' is OFF then this point is also a control point for the array. i.e. this point is effectively rotated and the arrayed objects maintain there relative position to the rotated point. See examples below.
The prompt now reads:
Give point to Array to:
This point defines the end angle of the array. As the cursor is moved a number of copies (specified by the 'No.' option) are dynamically drawn.
The spacing between the objects is controlled by the angle between the two previous points and the cursor position. Select the point to array to using any of
the snaps and input options. The 'point to array to'
can be defined using any of the
snaps and input options.
A quick method is to use direct input.
Simply type the angle value and press
 .
Even though a point or co-ordinate can be used to define the 'point to array to' Draft it accepts the first value entered as an angle as this would
be the most common method of defining a polar array rotation. The array is now complete.
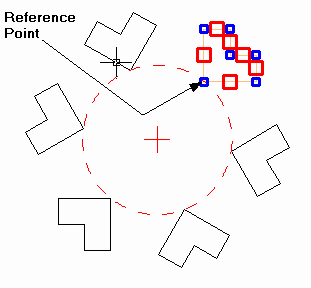
The following examples shows the different effects that various options have on the polar array function. Each example has the same original object to array and the same centre point for rotation.

For this first example 'Rotate Copies' was switched ON, 'No.' of copies is set to 6. After picking the reference point the
 Polar
input option was selected and 60 was entered into the angle field.

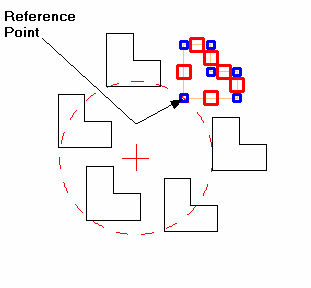
This next example is identical to the previous one except that 'Rotate Copies' was switched OFF. See how the reference point is rotated and the arrayed objects maintain there relative position to the rotated point.

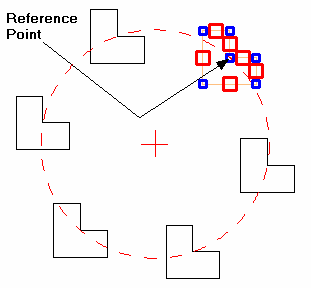
This next example is exactly as the previous one except for a different reference point.
When 'Fit Copies' is selected the angle defined instead of being the angle increment between the copies become the total angle of the array, effectively the copies are equally spaced across the total angle.
