Draft it Help System
The complete Help system for Draft it is available on these pages.
Available in: Architectural
Use this command to insert a staircase. Select the 'Staircase' button
 and the following dialog box appears.
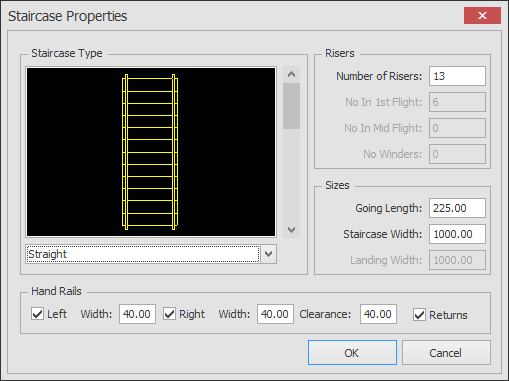
Use the scroll bar or drop down list to select the staircase type, either Straight, Quarter turn or Half turn. Set the values as required, these are (depending on the type selected).
Number of Risers - This is the total Number of Risers, the default number is 13
No. in 1st Flight - For Quarter and Half turn staircases, you may specify the number of steps in the first flight.
Going Length - This is going length, the default is 225
Staircase Width - This is the total width of the staircase, default 1000
Landing Width - This is the landing width, default 1000
Justification - Can set as Left, Centre or Right for positioning the staircase
Hand Rail Left Width - Specify the left handrail width, switch this handrail on/off with the tick box
Hand Rail Right Width - Specify the right handrail width, switch this handrail on/off with the tick box
Clearance - This the clearance of the handrail from the edge of the staircase
Returns - Adds a curved end return to the handrail
Once all of the settings are correct click OK, the dialog box closes.
The selected staircase is attached to the cursor and its 'justification'
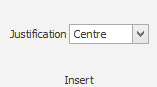 can be changed in the Ribbon
The insertion procedure and prompts are slightly different for the three staircase types.
1) Straight
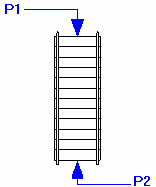
Give top point for landing:
The resulting staircase is now attached to the cursor at the top of landing at the justification point (P1 in the example here). Position this using any of the snaps and input options. The prompt now reads:
Give control point for bottom of the staircase:
This point controls the rotation of the staircase (P2). Select this using any of the snaps and input options.
2) Quarter Turn
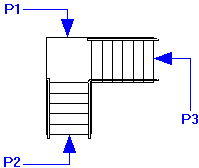
Give top point for first landing:
The resulting staircase is now attached to the cursor at the top of landing at the justification point (P1 in the example here). Position this using any of the snaps and input options. The prompt now reads:
Give control point for bottom of the staircase:
This point controls the rotation of the staircase (P2). Select this using any of the snaps and input options.
Give control point for top landing:
This point allows the 2nd flight to be flipped either side of the first flight (P3). Select this using any of the snaps and input options.
3) Half Turn
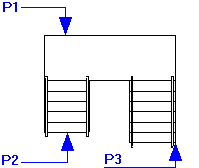
Give top point for first landing:
The resulting staircase is now attached to the cursor at the top of landing at the justification point (P1 in the example here). Position this using any of the snaps and input options. The prompt now reads:
Give control point for bottom of the staircase:
This point controls the rotation of the staircase (P2). Select this using any of the snaps and input options.
Give control point for top landing:
This point allows the 2nd flight to be flipped either side of the first flight, it also sets the width of the mid-landing (P3). Select this using any of the snaps and input options.
See Modifying/Moving a Staircase for information on how an staircase can be edited.