Product Documentation
Draft it Help
Select the category below to quickly find the help you need.

Available in: Architectural
Before we draw the internal walls we will switch off the hatching for clarity. To do this select the
 Hatching
button toggle.
Hatching
button toggle.
Select the
 Walls
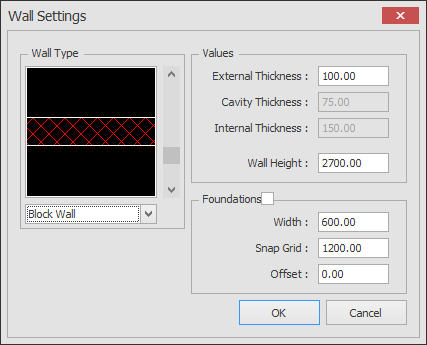
button again and set the dialog box and match the settings here and click 'OK'.
Walls
button again and set the dialog box and match the settings here and click 'OK'.
Make sure the 'Justification' is set to 'Left' and move the cursor to the 1st point which is the internal corner point in the left hand picture below. Click on the corner when the End Snap symbol is displayed. Move the cursor directly up an snap to the Perpendicular on the wall above.

Press the key to stop drawing walls and then click the right mouse button (or press 'Return') to 'Repeat Wall command. Click 'OK' to accept the dialog box settings.
The 2nd wall shown in the right-hand' picture above is 'Right' Justified. Snap to the End
point at 'Point 1' and set the 'Justification' to 'Right'. Move the cursor directly up and snap to the
Perpendicular point on the wall above.
key to stop drawing walls and then click the right mouse button (or press 'Return') to 'Repeat Wall command. Click 'OK' to accept the dialog box settings.
The 2nd wall shown in the right-hand' picture above is 'Right' Justified. Snap to the End
point at 'Point 1' and set the 'Justification' to 'Right'. Move the cursor directly up and snap to the
Perpendicular point on the wall above.
Re-select the
Walls button.
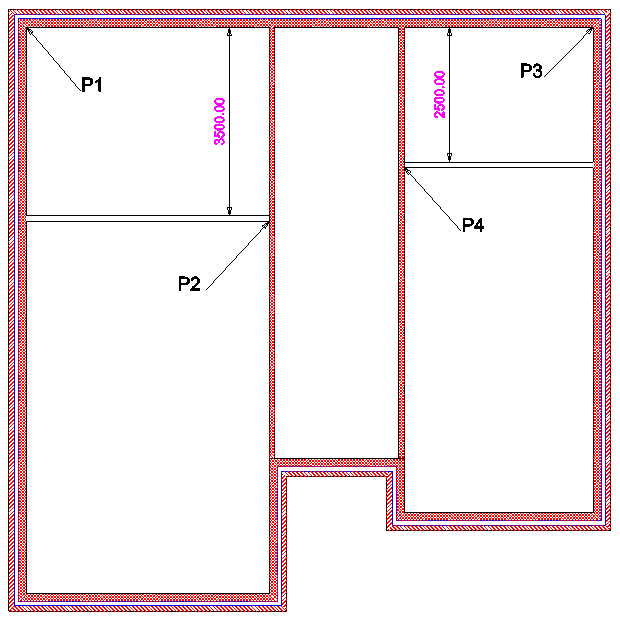
Change the wall type to 'Stud wall' and click OK. As you can see in the picture below the 1st wall point is 3500 down from the internal corner.
To select this point correctly we will use Relative.
Move the cursor over the internal corner point (P1) and when the 'End' snap symbol
 is displayed hit the
 key.
You will now see dynamic dimensions drawn from the corner to the cursor. Move down the internal face of the wall and click to accept when the Y value is '-3500' and the X is '0'.
(Alternatively after pressing the
key.
You will now see dynamic dimensions drawn from the corner to the cursor. Move down the internal face of the wall and click to accept when the Y value is '-3500' and the X is '0'.
(Alternatively after pressing the
 key press the
 key, type in 3500 and press
 , set the 'justification' to 'Left', press
 to select '
Snap mode and move across to 'P2' and snap to the
Perpendicular point on the wall.
to select '
Snap mode and move across to 'P2' and snap to the
Perpendicular point on the wall.
Press thekey to stop drawing walls and then click the right mouse button (or press
 ) to 'Repeat Wall command. Click 'OK' to accept the dialog box settings.
Move the cursor over the internal corner point (P3) and when the 'End' snap symbol
is displayed hit the
) to 'Repeat Wall command. Click 'OK' to accept the dialog box settings.
Move the cursor over the internal corner point (P3) and when the 'End' snap symbol
is displayed hit the key. Now press the
 key, type in 2500 and press
 , set the 'justification' to 'right', press
to select '
Snap
mode and move across to 'P4' and snap to the
Perpendicular point on the wall.
, set the 'justification' to 'right', press
to select '
Snap
mode and move across to 'P4' and snap to the
Perpendicular point on the wall.
Re-select the
Walls
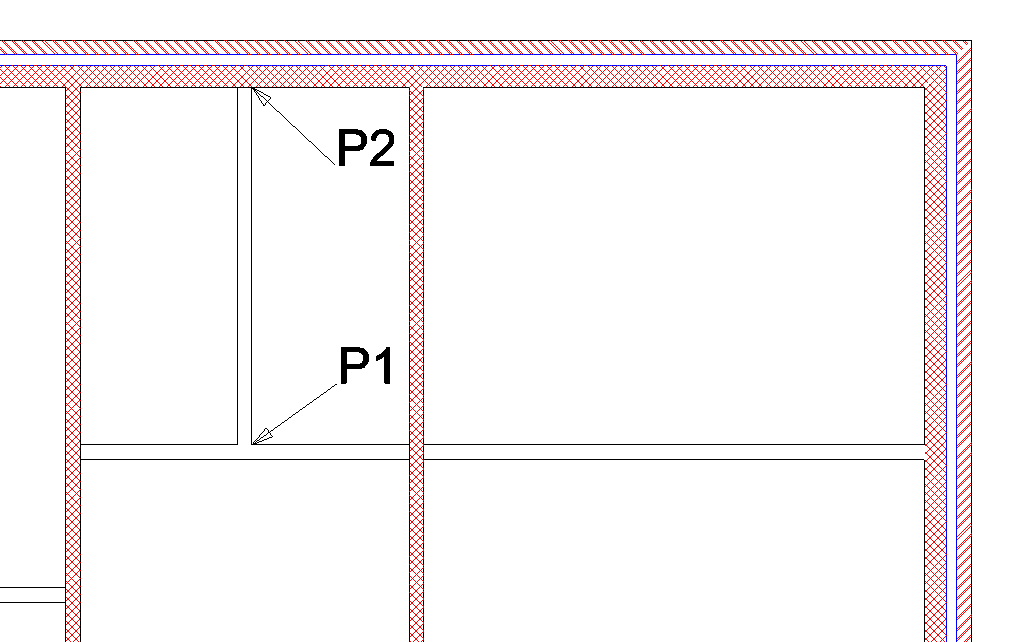
button, there is nothing to change in the dialog box so click OK. As you can see in the picture below the P1is the end of our last wall. The next wall is in line with this
but its start point is on the other side of the vertical wall at P2. To select this point correctly we will use the
X Snap and Y Snap feature. Move the cursor over the 'End'
point at P1. When the 'End' snap symbol
is displayed hit the key to grab the 'Y' value of the point, the cursor is now locked vertically. Make sure that
 nearest snap is turned on and move across to P2 and click when 'Near' snap symbol
 is displayed.
Now turn off
nearest snap and make sure the 'justification' is set to 'Right'. Press
to select '
Snap mode and move across to 'P3' and snap to the
Perpendicular point on the wall.

Repeat the Walls command and snap to the 'Mid'
 of the new wall at indicated at P1 in the picture below. Set the justification to 'Centre' and snap to the Perpendicular
point on the wall above at P2.
of the new wall at indicated at P1 in the picture below. Set the justification to 'Centre' and snap to the Perpendicular
point on the wall above at P2.
The internal walls on the ground floor are now complete.
Any questions?
Perhaps you need help deciding which of our CAD systems is right for you, or maybe you need to chat with us about our bespoke development service.
Don’t hesitate to get in touch. The Draft it team is dedicated to ensuring you get the best design experience on the market. Whatever you need - call us, email us – we’re here to help.
 +44 1543 419 886
 enquiries@cadlogic.com
 Postal Address Details