Product Documentation
Draft it Help
Select the category below to quickly find the help you need.

Available in: Architectural
The next stage is to draw our building profile. Select the
 Walls
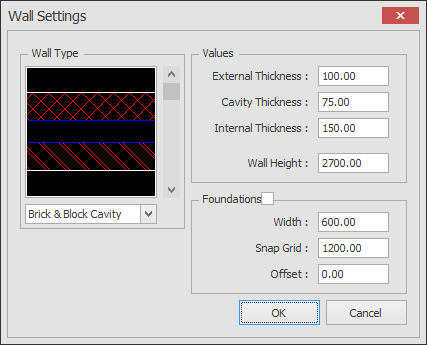
button and the 'Wall Settings' dialog box is displayed. Here you can set/change the current wall type. Change the settings to those shown below.
Walls
button and the 'Wall Settings' dialog box is displayed. Here you can set/change the current wall type. Change the settings to those shown below.
Click OK to exit the dialog box and the command prompt reads:
Give Start Point:
We will now create the outer wall profile to the dimensions shown below.
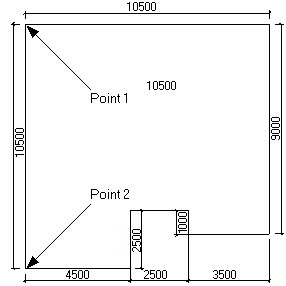
We need to place 'point 1' toward the top-left of the drawing area. After you have clicked this point you will notice that Draft it Architectural draws a dynamic wall from the point indicated to the cursor. Move the cursor down below 'point 1' toward 'point 2'.
You will notice that the Ribbon has changed to display a Command Specific Ribbon for drawing walls. The wall ribbon group has two options, these are 'Justification' and 'External Side'. Ensure that the 'Justification' is set to 'Right' and 'External Side' is set to 'Right'.
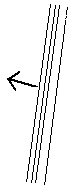
An arrow displays which side of the wall is the external face. It is important that the external face of adjoining
walls match to ensure that the corners are tidied up correctly. The easiest wall to draw orthogonal walls is to use
Arrow Key Input. Press the down arrow key
 , type '10500' and press
 . The first wall section is drawn.
Press the keyboard right arrow key
 , type '4500' and press
 .
.
You can see how easy it is to create the walls. Continue as follows.
Press the keyboard up arrow key
 , type '2500' and press
 .
.
Press the keyboard right arrow key
, type '2500' and press
 .
.
Press the keyboard down arrow key
 , type '1000' and press
 .
.
Press the keyboard right arrow key
, type '3500' and press
 .
.
Press the keyboard up arrow key
, type '9000' and press
 .
.
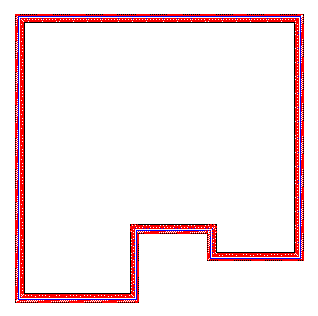
Now type to close the wall profile. The finished wall profile should like the picture below.
Any questions?
Perhaps you need help deciding which of our CAD systems is right for you, or maybe you need to chat with us about our bespoke development service.
Don’t hesitate to get in touch. The Draft it team is dedicated to ensuring you get the best design experience on the market. Whatever you need - call us, email us – we’re here to help.
 +44 1543 419 886
 enquiries@cadlogic.com
 Postal Address Details